Showing posts with label sewing. Show all posts

Friday, October 12, 2012

Hoot the Owl Halloween Costume


Z wants to dress up as an owl this Halloween. Not just any owl, but this owl - Hoot from the Old Bear and Friends videos.

This is a big deal for us because she went through a phase of being afraid of owls. Every night we had to assure her that no owls were in the room or hovering outside. We told her about all the friendly owls in all the stories and shows she likes, and she finally landed on this owl as the good owl.

So to make her costume, I had to improvise. The owl in the story is more lambswool than feathers, and wears a blue starry dress/apron throughout. I thought it would be better to make it more owly. And more comfortable for a little girl to bounce around and enjoy herself.

Over the months of owl reassuring, I became a big connoisseur of owls. I found a blogs about owls (My Owl Barn is a great aggregater of owls) and sewed owls and generally found myself drawn to anything with an owl on it. Which turns out to be a lot of things.


I started with a long sleeved white shirt and a pair of white leggings. Then I attached felt feathers (a sort of "u" shape) for the owl tummy. These were sewn on, but with a very simple basting stitch that will be easy to remove when she wants to stop being an owl.


The feathers were meant to be in concentric circles, but imperfect ones. It works like an attached bib.

  
Next I cut some wings from an old sheet. These were based on the ones in this tutorial because I thought the shape was just beautiful.


The wings were sewn together with an opening at the neck for turning, and pinked up to make them lay nicely. Then I turned them inside out (being a white sheet, there weren't right sides) and pressed them, sewed the neck shut, and sewed the tops of the back part of the wings together.

The ensemble mid-feathering
I could only find white leggings with lace edging in my short search, but thought a few feathers placed at the cuff would cover that fine.


The wings presented a problem because I wanted them to be more owl than fairy and that meant feathers. I saw this owl cartoon and thought three tiers of feathers on the wings would work out well.
 

First I cut some longer feathers - an elongated "U" really.


Then I placed them in three rows and sewed them down at their base with the machine. This gives them a bit of swing when the wings move.


Last I made a mask, a piece of paper folded in half with a big circle for the eye and a triangle for the ear made a pattern. I used brown buttons as the centers of the eye to be more like Hoot. I knew Z wouldn't want to actually wear the mask, so I attached the mask (with a safety pin) to a white hat she had.


And the final owl having fun. She kept the hat on for about 20 minutes and refused to have the wings attached to her arms because they "flapped better" free. Everybody thought she was dressed as an angel, which was funny. 


Thursday, July 19, 2012

Rabbit Fever


I'm still stuck on rabbits.


I tried making a little lion, and I do like him a very lot, but he's no rabbit.


Towards Easter I got inspired by Alice in Wonderland and sewed a White Rabbit and March Hare - complete with vests, a coat and a pocket watch chain. 


John Tenniel's illustrations inspired me and my bunnies weren't capturing them correctly. 
So I moved on.


To another bunny. 


Another literary bunny.


This may be due to the fact that I got some velveteen at SCRAP and hadn't figured out quite what to make with it. It may be that a friend's daughter had scarlet fever and the story got into my head. I tried to introduce some more character into them with surprised or pleading faces - trying to capture the parts of the story when the Velveteen Rabbit learns he has to be burned. They have bendable ears to be more expressive.


I've even toyed with a Runaway Bunny, though I'm not too sure.


And then I saw this marvel of a March Hair from Tim Burton's Alice. Brilliantly mad. And I'm back to Alice.

Wednesday, March 21, 2012

Bunny Houses


Ok, I saw this tutorial and it completely inspired me. When I pinned the tutorial it was the most popular pin I ever pinned - people like Altoid bunny houses. While Benny seems a wonderful bunny, I've made a load of rabbits recently trying to perfect the pattern for my own pocket bunny. So they need little houses, and this was great. I also have a billion Altoid tins around because I can't bear to just throw them out. 

But I had to try and work this idea in because for some reason I think we are going to be somewhere and desperately need the bunnies' home to have many rooms. Or I just think it's a really cool idea. 


First I traced the lid and the base on heavy paper (card stock) and cut it out. It took a bit of trimming to get it to fit, but not too snugly.


Z suddenly took interest in the project and decided to help by making shopping lists on the inserts. We needed many things and got very distracted.


After I got them back, I glued some scrap fabric onto one, which I sandwiched between two cutouts, clipped with binder clips and let dry.


I like binder clips. I made inserts for the top and bottom of the tin. This was a rookie mistake. The tin won't close tightly with the top insert in place.


Loosely following the Benny tutorial, I made a little blanket and pillow. And by now I clearly was into it, because I was making two at a time.


And there is one more little bunny home, complete with the bunny.


I also discovered that the bottom insert was totally OCD and not necessary because once the blanket and pillow were in, it never showed.


I tried to create a window with some felt, but didn't really like it. So that was replaced with "bunny art". On a piece of the card stock that is 2.25" X 1.75" I painted a carrot and some veggies. Then glued cut up craft sticks around it, for that gallery ready look.


I still wanted a window on one - just because.


So I punched a couple of holes in the cardstock, and poked a bit of wire through. I sewed a quick set of small curtains that are approximately 3" X 2", with 1/4" hem on three sides and small 3/4" casing at the top.


I cut out a picture from a magazine as the window itself.


The rabbits, as you can see, could hardly wait to move right on in.

A very big thanks to Benny's creator (Katie Lewis) for a fantastic idea! 


Saturday, February 25, 2012

Pocket Easter Bunnies


These are my latest felt friends and I admit I have gone a bit nuts with them. I've been making them industriously and without regard to natural coloring.


They are smaller than an egg. 


Each has a little pink nose and fuzzy tail. 


They're good for sharing secrets with.


They also like to mill about in groups. They are now for sale so get yours today!


Saturday, January 21, 2012

Itty Bitty Lovebirds


I have never been all that into Valentine's Day. However, this year it is everywhere I look, and that could be because I tend to look at craft sites most of the time. So in all this looking it struck me that the thing to do was to join in. Actually, what struck me was that here I was sewing itty bitty birds all the time and there are birds that are perfect for this - lovebirds. Awww!
 

Lovebirds are a sort of social and affectionate parrot (thank you Wikipedia) and there are a number of varieties. They are monogamous and they are often seen cuddling which gave them their name. They are also a key element in the movie "The Birds" so it a natural evolution of my itty bitty birds.


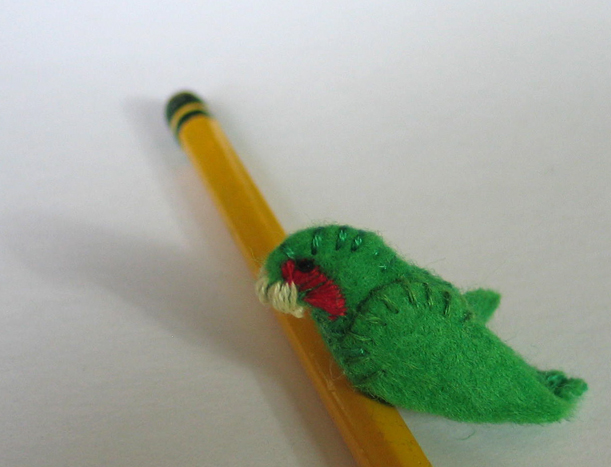
I started making the rosy-faced lovebird as seen above, using green felt for the bodies. I tried painting their faces, which wasn't so good. 


I tried felt applique, which was better. And from behind their faces made a little heart.


Then I tried embroidering the red bit, and that seemed best to me. But when I showed them to people, nobody could tell what sort of birds they were - it wasn't clear. Since I don't expect people to go off researching lovebirds simply because I'm interested in them, I went ahead and made some in a more seasonal color.


The thing about lovebirds is that you sort of want to make them in pairs. So I cut out a set.


I drew a vague half heart shape in pencil and then satin stitched it in red. I whip stitched on the wings.


Whip stitch the back seam...


... and the belly. Now, this is pretty much the same process as the itty bitty birds, so I was a bit slack in documenting it. In fact, I used different birds. I admit it. I'm still making them.


Stuff the bird, sew up the belly and paint eyes. I've tried to get the shut eyed look of the cuddling birds above on several of them, but I'm still working on getting it just right.


This part is sort of humorous to me, and that shows my humor. I sew their beaks together in a kissing position.


I added some jump rings and memory wire I had to give them a little space of their own. I'm not sure what to do with them now, as our home becomes increasingly full of 1.75" long birds, but they make me happy and I will wear them out on a chain or something. And sure, I'll "sell" some on Etsy. Does anybody buy there???


Of course, by the time I finished the red birds they were the new favorites.
 This is the template for both the lovebirds and the itty bitty birds.