This past summer we planned a fairly big trip which involved an 11 hour plane ride. Z was 20 months at the time and could sit still for about 12 seconds total. I had read about busy books and thought making one for her would be the perfect answer.
It was not.
She hated the book. She would cry or throw it across the room whenever I showed it to her. Perhaps it was too advanced. Perhaps she resented the time I invested into it. I don't know. She just wasn't going to be calmed on the plane by it. At the time it was a bit heartbreaking, but it's pretty funny now.
And now she likes to rip it apart so it does keep her busy.
This is how I began my collection of felt. I used white denim as the base for the pages and brown denim for the cover because I had it. I tried to spice it up with little embroidered designs here and there. Overall, I think it's a nice distraction.

The unfinished cover.

Button on Flowers.
This is one of the pages that I saw others had done and thought it was brilliant. The little red planter is a pocket.

Velcro Shapes and Fasteners
We practice the colors and names of the shapes as she throws them. She's shown no interest in the zippers, hooks or clips.

Counting and Tie a Shoe
I made the first three counting squares primary colors and the next three secondary colors to sort of subliminally get that information into her. It fell apart on the third set as I didn't find felt at SCRAP in tertiary colors. I don't mind if that didn't work. She likes to untie the shoe and try to put her foot inside.

Close up of the counting page

This page is about finding things.

Some of the things hidden around. The cloud hides an airplane. The kite has a hanglider behind it. The ducks are held on by fishing line which allows them to "swim" back and forth. The water comes off to reveal fish. All the leaves have birds or bugs hidden underneath, and that black circle in the trunk of the tree hides a squirrel.

An extra close up on this, my favorite bird.

Textures and Snap on Balloons
Soft, smooth, silky, bumpy and scratchy (a scouring pad). I tried to make a little carnival by the balloons.

Eddie's Garden
Z loves a book called Eddie's Garden, so this was my homage to the illustrator. The carrots snap on, as do the peas and the pumpkin. The corn, the chard and the sunflower are velcro, and there's a little rabbit hidden near the peas. Lots of busy birds and bugs populate the book, so I tried to copy that (with some problems around the border).

A little pocket to hold all the bits that fall off.
 For most of my life, birds have creeped me out - I've never been a big fan. Not only because of the movie "The Birds" (which I just learned was based on a real incident) after which I could never view any group of birds quite the same. But also because my dad liked to describe them as filthy creatures, full of diseases which takes the romance right out. However, picture books are just full of them, and they can be very pretty. Also, Z loves them, even pigeons, which I cannot abide. So I recently got excited about making birds.
Woodland pictures are chock full of birds. I don't seem to be getting over making small felt animals, so why not add in some birds. The problem of course is scale. The little animals are .. well ... little - Mr. Deer towers at 6" tall. The birds have to be itty AND bitty to work in this world. Oh, and I had to start with robins. Why? I think robins are the most woodlandy. All of which makes a nice little intro into this - the itty bitty bird tutorial.

I have made a LOT of birds in the past few days. Little difficult birds. They do require good felt and good light. And patience.
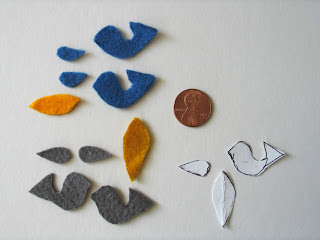
With a lot of that practice and my own growing prop house for a felt remake of "The Birds", I landed on the pattern I like best. Some aspects were inspired by things I've seen and patterns I've downloaded. I can't thank the kind people who post these things enough. There are pictures of a few different birds being constructed because some of the photos are better on one or the other. I cut out the birds from the best felt I had.

First I sewed on the wings. This is good planning, and has nothing to do with my desire to hide casting on and off.

Then I sewed the back seam.

This is where I think I am so clever. I twisted the tails to line up and used the decorative straight stitches to hold it in place.

Sew on the belly.

Stuff her up. That odd tool is something of Adrian's that he lent me and is never getting back. He claims it is a dental instrument.

On these birds, I've taken to painting the eyes and beaks. I don't know if that is cheating, but it looks better.

I've expanded to the gray birds, canaries and briefly to a bird with open wings. I've even got the little blue bird to add. So the little tree is filling up slowly. Just like in the movie.

This is my first tutorial, and my first real attempt to blog and I'm new to the art of felt critters, so bear with me.
The jellyfish, like all the felt things I make, is created entirely from stuff I got at SCRAP (www.scrap-sf.org). They do not label the felt, and I'm just learning to tell the wool blend from the acrylic, though I can usually tell the good pure wool. The felt here is probably wool blend and obviously wrinkly, but, because I wasn't completely sure, I didn't iron it. I also hate ironing.
 At this point, I lay out the colors and pretend that I actually keep my embroidery floss remotely neat. It really lives all bunched up in a pouch with a Snickers bar, but perhaps organizing it will be a resolution. I've tried to pin pattern pieces to the felt in order to cut them out, but it seems when they are this small (these are 2 1/2" long by 1" wide) to be easier to trace the pattern directly onto the felt.

Cut out six pieces of the body shape (template), and begin to sew it together.

I am a fan of the blanket stitch. I've tried whip stitch and it's a good stitch, but I'm not good at it. I also sort of remember reading somebody else say that the blanket stitch was a bit "country" which works for me. I could have it completely backwards and she might have said whip stitch is "country", but I'm doing blanket. Somewhere I envision camps of whip stitchers battling it out with blanket stitchers, but this is just fun to imagine while I'm stitching. Both work.

More stitching

At this point it looks a bit like a star fruit or something organic. I think.

Now it is time to stuff it. Yes there is a bit of excess thread I didn't cut off, but the legs will be there and my laziness pays off.


I pull the extra thread through the body to create a bit more of a jellyfish shape.

I tie off the thread at the top. Now the body is sewn.

Here I've decorated the body with a bit of super simple stitching - one straight stitch on either side of a lazy daisy stitch toward the top center of each panel.

Time to add some legs! This is really a choice thing. The legs can be a single color of floss using all 6 strands about 8 inches long, and separating them at the end for fuller looking legs. I chose to make them 5 strands of different colors. Yes, 5 not 6. I also chose to use silver metallic floss, which is just a nightmare to work with. I love the look, but it never cooperates.

Tie off the legs with a simple slip knot.

I try to make two rings of 6 legs each, which sort of gives it depth. The outer ring (green circle) I place at the seams for no other reason than I like it. The inner ring (red circle) I put towards the middle of each panel.

And there you have it! A jellyfish or something that looks like it would be perfectly at home inside I Dream of Jeanie's bottle.

You can add a nice ribbon or cord tie to hang it, or you can accidentally leave it lying around for the cat and the toddler to argue over.

 This year, while looking for some projects for the art co-op I help run, I found some little felt seahorses. It was an ornament created by Futuregirl (futuregirl.com) and I was in love. These would never work for the pre-preschool crowd that comes to art co-op, but it was my holiday project to make them for everybody I loved. However, her patterns are for more skilled craftsmen than me, with better quality felt. I modified/simplified the pattern and then made the jellyfish. Nothing says festive like a felt jellyfish.

Then I met Ms. Cynthia Treen's adorable reindeer, and so I left the world of sea creature felt for a felt woodland. I could barely get the stuffing down those skinny legs, so I made all my creatures a bit chunkier. If anyone wants to make a felt jellyfish of their own, I'll post the pattern.


